A Quickstart Guide to Documenting Your Prefixes with IRR
Part of running an autonomous system is setting up BGP peering sessions with other networks to exchange routing information. Unfortunately, BGP is a very trusting protocol that tends to send and receive everything by default, so it is not at all unusual for users of BGP to accidentally send many more routes to one of their peers than they intended. This makes your peer unhappy because your peering link suddenly becomes an integral part of their network backbone, and you’re unhappy because you’re suddenly gifting lots of bandwidth to one of your peers when you didn’t intend to.
The key to correcting this is filtering. When you set up a peering session with another network, you should clearly agree on which prefixes you’re willing to accept from them and which prefixes you intend to send them. You then don’t trust each other and filter such that only those prefixes are accepted on the receiving end. The problem with trying to manage this agreed-upon list of prefixes manually is that it means that every time you add a new block of IP addresses to your network, you need to contact every one of your transit providers and peers and try and get them to update their prefix filters on what they accept from you; a trivial task for maybe the smallest of networks, but it doesn’t scale.
To help automate this task, the Internet Routing Registry (IRR) and the Routing Policy Specification Language (RPSL) were developed to allow you to, in a formal way, describe your routing policy and post it online. This is done by the network of mutiple IRR databases (notable ones include radb, altdb, and those run by the Regional Internet Registries) who allow you to create RPSL objects in their database, which they then serve to others answering their whois queries generating BGP filters.
One of the most notable problems with RPSL is that it was designed as a fully expressive domain specific language to entirely describe your entire routing policy. Not only what prefixes you plan to originate and transit (barring any accidental typos in your BGP configs) but RPSL tries to support describing all of your routers, and your peering connections, and how you use BGP communities, so RPSL ultimately has become a relatively complex beast of a language. This is a problem because, since using IRR is relatively optional in most cases online, making the notation for it prohibitively complex to be able to entirely cover your routing policy just means it became impenetrable and any networks without a deep bench of network engineers simply ignored it.
This article hopes to correct this failing of RPSL by being a simple, step-by-step, introduction to the bare minimum of IRR needed to enable your peers to filter your prefixes while not costing you any money.
If you would like to follow the original vision of IRR and entirely describe your routing config to the level of detail that allows you to entirely synthesize your router’s BGP config from whois queries, all the more power to you. This article won’t cover that. Trying to dive into all of RPSL and talk about every knob available on it makes it seem too complicated, but if we only touch on the parts needed to enable others to generate prefix filters for your network, it’s not prohibitively difficult.
The rest of the article will be covering a bare-bones RPSL config for a basic network, with maybe a few downstream transit customers. We’ll assume that you aren’t consuming RPSL from the IRR yourself, which is probably reasonable for your router configs, but you likely will want to look into how to generate filtering yourself for your peer’s prefixes.
Selecting an IRR Database
The first step is to select which IRR database you’d like to use to host your RPSL objects. There is a movement to having the IRR databases managed (and verified) by the five RIR (Regional Internet Registries), so it’s likely the most preferable option would be to try and use whichever RIR is local to your network. The issue there is that the support for IRR is inconsistent per RIR, usually limited to their customers, and each has their own set of details and restrictions, so writing one guide to cover all five is more difficult. The second option for which IRR database to use would be RADB, which is the most popular, but they charge $500 per year for an account, so unless you’re really passionate about IRR filtering or willing to pay $500/year for a nice web front-end to creating IRR objects, RADB might not be a good choice. Since we want this guide wants to be applicable to as many networks as possible, and we’re not willing to expect networks to spend money implementing IRR filtering just for the good of the rest of the Internet, we will be using the AltDB server; maybe not the best choice, but AltDB doesn’t have any special requirements about which networks it will serve, is region neutral, and most importantly, free.
The process for posting your prefixes in Six Easy Steps
- Create a
mntnerobject (equivalent of a user account) to give you the ability to create IRR objects in your selected IRR database - Create an
aut-numto represent your autonomous system and describe its contact information (admin and technical) and your routing policy - Create an
as-setto describe which autonous system numbers your peers should expect to see from you (namely your own and your transit customers) - Create a
route/route6object for every prefix originated from your network - Update your peeringdb profile to include your IRR peering policy
- Bask in the glory of enabling your peers to properly filter your peering sessions
Step 1: Create a Maintainer Object
Your maintainer (mntner) object is the IRR equivalent of your user account, so this is where you define what person (or organizational role, such as the Network Operations Center) is responsible for creating and deleting objects for your autonomous system.
Depending on which IRR database you select, the exact requirements on the formatting for your maintainer object will vary, but for this example we’re specifically using AltDB, so their recommended format will be used.
To create the mntner object (as well as all the rest of the IRR objects later), you will first create the contents of the object, and then paste the text of each object in the body of a plain text email to [email protected].
This email address is the IRR daemon which automatically processes IRR objects submitted to AltDB and adds properly formatted ones to the IRR database.
In this case of initially submitting your mntner object, since you don’t already have an account, it will get rejected, but automatically forwarded to the database admins to manually review and approve.
Once they approve your mntner object and add it for you, you’re able to handle all of the rest of your object add/deletions automatically just emailing auto-dbm.
The recommended format for the mntner object for AltDB is:
mntner:     MAINT-AS64496
descr:      Maintainer for Example Company Inc
admin-c:    JOESMITH-RIPE
tech-c:     JANEDOE-ARIN
upd-to:     [email protected]
mnt-nfy:    [email protected]
auth:       MAIL-FROM [email protected]
mnt-by:     MAINT-AS64496
changed:    [email protected] 20180711
source:     ALTDB
Let’s step through this one line at a time:
mntner: MAINT-AS64496 - This names the mntner object, and is the string that must be tagged in every object as mnt-by: MAINT-ASnnnn so the database can know who the object is maintained by. Typically named with your own autonomous system number at the end.
descr: Maintainer for Example Company Inc - This is a human readable description of what organization this maintainer object is for.
admin-c: JOESMITH-RIPE - This is a NIC handle for a human or role who should be the administrative contact for any objects managed by this mntner.
tech-c: JANEDOE-ARIN - This is a NIC handle for a human or role to contact for technical aspects of objects managed by this mntner.
Both of these NIC handles are formatted as UniqueString-SourceDatabase, and have typical contact information like a name, email, phone number, mailing address, etc.
It’s likely that your RIR has already created NIC handles for you, so look in your account dashboard or run a whois query against an IP address or ASN controlled by your organization to see if you can find it.
If for some reason you need to manually create a NIC handle in AltDB, format it as SOMETHINGUNIQUE-ALTDB and see sections 3.2 and 3.3 of RFC2622 for the exact formatting of the person and role class objects.
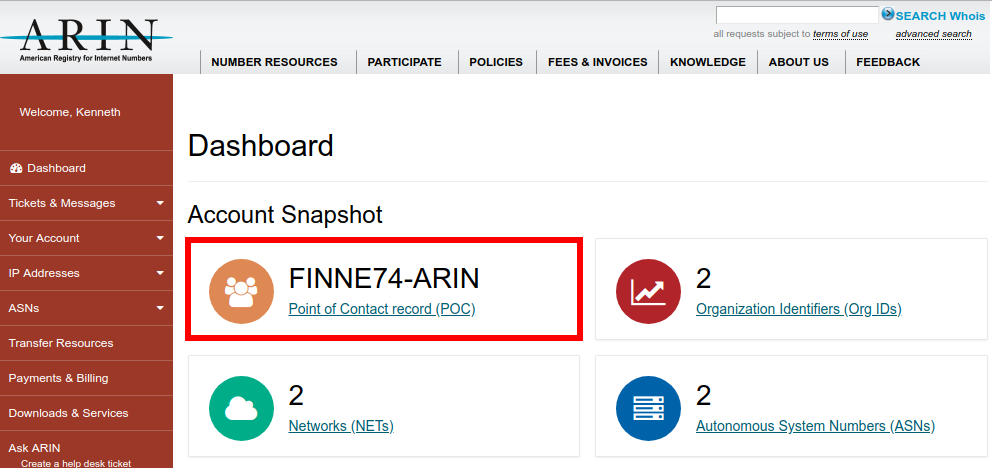 For example, the Point of Contact (POC) record set up by ARIN and found on your account dashboard can be used for an
 admin-c or tech-c contact.
upd-to: [email protected] - This is an email address which gets notified for every unauthorized attempt to update an object maintained by this mntner
mnt-nfy: [email protected] - This is an email address which gets notified for every successful attempt to update an object maintained by this mntner
auth: MAIL-FROM [email protected] - This is a definition for how users should be authenticated as this maintainer to be allowed to update objects.
MAIL-FROM is the most basic authentication model, all that this method requires is that objects are send to the auto-dbm email address from the email address listed. If you’d like to allow multiple accounts to manage this mntner object, simply create multiple auth: MAIL-FROM lines. It really isn’t very good since it’s relatively easy to spoof source addresses in email. As a result, AltDB is deprecating this method and no new maintainer objects using it will be created. Instead, please use CRYPT-PW.
CRYPT-PW is more secure: you use a clear-text password (which you keep secure and should never share) to generate an encrypted password. For example, the string HelloAltDB might generate the encrypted password Y24XnZoZgBYzE, and in your obect you would include CRYPT-PW: Y24XnZoZgBYzE as the authentication model. You can use [this tool] (https://www.radb.net/crypt_calculator) to generate the encrypted password.
mnt-by: MAINT-AS64496 - All objects must be tagged with a mntner. Since this mntner is managed by itself, once created, updates to the maintainer object can be handled automatically.
changed: [email protected] 20180711 - This is, by convention, the change log of who last updated this object and on what date (as YYYYMMDD).
Multiple changed tags are even allowed, if you would prefer to keep the full trail of who modified objects when, but that’s a policy your network needs to decide on its own.
source: ALTDB - Every object needs to be tagged with which IRR database they’re originally from, so since this mntner object is getting submitted to AltDB, that’s what we put.
If you’re using a different IRR database, you’ll need to change this line on all of the examples.
String all of that together (updated to match your organization), paste it in an email to [email protected], press send, and you’ve taken your first step towards IRR paradise!
Give the AltDB admins a few days to review your mntner request (since they’re doing it in their spare time), and you should ultimately hear back that your object is approved.
If you’d like a quick reference from your IRR database on all the allowed fields in an object, and which ones are mandatory vs optional and whether you can have more than one of the field in an object or not, try running a whois -t OBJECTNAME query against that server.
For example, to get the supported syntax for a mntner object from AltDB:
user@hostname:~$ whois -h whois.altdb.net -t mntner
mntner:    [mandatory]   [single]     [primary/look-up key]
descr:     [mandatory]   [single]     [ ]
admin-c:   [mandatory]   [multiple]   [ ]
tech-c:    [optional]    [multiple]   [ ]
upd-to:    [mandatory]   [multiple]   [ ]
mnt-nfy:   [optional]    [multiple]   [ ]
auth:      [mandatory]   [multiple]   [ ]
remarks:   [optional]    [multiple]   [ ]
notify:    [optional]    [multiple]   [ ]
mnt-by:    [mandatory]   [multiple]   [ ]
changed:   [mandatory]   [multiple]   [ ]
source:    [mandatory]   [single]     [ ]
This is also all generally documented per object class with some explanation in RFC2622 or RFC4012.
Step 2: Document Your Autonomous System’s Routing Policy
Now that you have what you might call a user account for your IRR database of choice, the next steps will be to start populating it with all the objects needed to describe your network.
This begins by crafting the aut-num autonomous system number object, which will be used to tag each prefix for which Autonomous System it comes from, and specifies what sets of prefixes are exported from this AS to any of its peers.
aut-num:    AS64496
as-name:    EXAMPLECOMPANYINC
descr:      Example Company Inc
mp-export:  afi any.unicast to AS-ANY announce AS64496:AS-ALL
admin-c:    JOESMITH-RIPE
tech-c:     JANEDOE-ARIN
mnt-by:     MAINT-AS64496
changed:    [email protected] 20180711
source:     ALTDB
Again, let’s break this object down piece by piece.
aut-num: AS64496 - The naming format for an aut-num must be “ASnnnn” where “nnnn” is your autonomous system number.
Much like your mntner object, but more strict.
This is the label you’ll be tagging all your route/route6 objects with later for which ASN they’re originated from.
as-name: EXAMPLECOMPANYINC - Give your aut-num a short symbolic name. It’s not quite clear what this is used for, but it’s required.
descr: Example Company Inc - Give your aut-num a nice human-readable name to make their lives easier.
mp-export: afi any.unicast to AS-ANY announce AS64496:AS-ALL - This line describes your network’s multi-protocol export policy, and tends to be the most unique depending on exactly how detailed you want to be with describing what routes you send to your peers.
“Multi-protocol” in this case means IPv4 and IPv6, “afi” stands for address family identifier, so “afi any.unicast” means you have the same export policy for both IPv4 and IPv6.
“to AS-ANY” means that this policy is for any of your peering links, which will be generally true until your peering policy gets sophisticated enough that you start having different policies per peer.
And finally “announce AS64496:AS-ALL” means that to the described set of peers (in this case all of them on both IPv4 and IPv6) we will be annoucing the list of autonomous system numbers AS64496:AS-ALL, which is an as-set object we’ll define later.
admin-c: JOESMITH-RIPE
tech-c: JANEDOE-ARIN - We once again need to set an administrative and technical point of contact NIC handle which is a person or role object in either this IRR database or a different IRR database.
mnt-by: MAINT-AS64496 - This defines which mntner accounts have permission to modify this object, so make sure that this matches your mntner: MAINT-ASnnnn object key.
changed: [email protected] 20180711 - The change log for who modified this object on what date.
source: ALTDB - And finally which IRR database you’re creating this object in.
You’ll be needing this tag on every object, so embrace it.
At this point, you’ve created an object for your actual autonomous system, except that there’s still no IP address blocks tagged to it, and we’ve described a routing policy using an as-set list of ASNs which we haven’t defined.
Explaining this part of RPSL is a little tricky, since aut-num export and mp-export statements generally reference as-sets, which also reference aut-nums, and export statements can get extremely complicated since they allow all sorts of boolean logic.
For example, you can create multiple as-set objects, then define export statements per peer with different sets of ASNs exported per peer, ANDed together with individual prefixes and route-set objects, which are sets of individual prefixes.
This example just included one export policy for all peers, which is probably pretty good for most networks.
You can also include “import” statements, which describe which prefixes you will accept from peers, including what actions should be taken on those prefixes, such as applying communities or local preferences. This is where RPSL starts to go off the rails and go from being a way to help your peers generate prefix filters to trying to enable you to entirely describe your router configuration in a public database. Like already said, if you would like to try and describe what your import filters should be or what routes are getting injected into your interior gateway routing protocol (i.e. OSPF) using RPSL and use it to generate your router configurations, all the more power to you, but it’s likely you already have some other method to manage your router configs which you’re comfortable with.
Step 3: Create Your Sets of Autonomous System Numbers
If you’re a network who will absolutely definitely never offer transit to any other ASN, this step is actually not necessary.
If you know that you won’t have any downstream transit customers or different ASNs inside your network handling anycast or something, you can skip right past this section, and just need to go back and replace the as-set object in your export statements with your aut-num tag itself (i.e. mp-export: afi any.unicast to AS-ANY announce AS64496)
On the other hand, if you think you might ever need to describe export policy including other ASNs, it might be a good idea to just define your export policy in terms of sets of ASNs.
Even if you currently don’t have any downstream customers, you can just define an as-set only including your aut-num, and just need to come back later and modify this one object.
There are a lot of networks which just try and name their as-set objects something unique so there aren’t collisions with as-set names from other networks, and the requirements / conventions likely vary from IRR database to database, so we are again presenting AltDB’s recommended naming convention for objects.
To make sure that all of your as-set object names are unique, you should take advantage of the fact that you’ve already paid an RIR money to ensure that your ASN is unique, and preface the as-set with your aut-num object name.
You follow this with a colon, and “AS-“ to easily identify this as an as-set as opposed to a route-set or some other sort of object.
You can finally apply a useful name for the set such as “ALL” to cover yourself and all your customers, or “CUSTOMERS” to cover your customers but not yourself.
(i.e. AS64496:AS-ALL or AS64496:AS-CUSTOMERS)
as-set:     AS64496:AS-ALL
descr:      A set of ASNs including yourself and your customers or other as-sets
members:    AS64496
members:    AS64501, AS64502
members:    AS64496:AS-CUSTOMERS
mnt-by:     MAINT-AS64496
changed:    [email protected] 20180711
source:     ALTDB
The only two new lines unique to the as-set is the as-set: line which defines the name which this set of ASNs is referenced by, and the list of members.
If you were setting up this “ALL” set before you had any transit customers, your list of members would be real short: members: AS64496. On the other hand, you can include as many lines of members as you like, so for each additional aut-num you would like to include, you can either add a new members line or add them to an existing comma separated line.
As shown on the third members line, you can even include other sets in your members, so the most likely contents of your “AS-ALL” set would just be your aut-num and a second as-set for your customers:
as-set:     AS64496:AS-ALL
descr:      A very likely contents of your AS-ALL set
members:    AS64496
members:    AS64496:AS-CUSTOMERS
mnt-by:     MAINT-AS64496
changed:    [email protected] 20180711
source:     ALTDB
You can then define a second set AS64496:AS-CUSTOMERS to list your downstream networks.
Or not. You can do whatever you like with as-set objects to try and describe your routing policy in as easy a way as you like.
For most networks which are not providing transit to anyone, it’s very likely you don’t need any as-set objects at all.
Just define your export policy in terms of your aut-num, ignore this whole section, and move on with life.
Step 4: Create Route/Route6 Objects for Each of Your Prefixes
By this point, you’ve created your IRR maintainer account, an object for your ASN and routing policy, and possibly even sets of ASNs to manage your list of customers.
But we still haven’t actually documented any prefixes coming from your ASN, and that was the whole point of this article, so lets get into the syntax of actually creating route objects for IPv4 prefixes and route6 objects for IPv6 prefixes.
route:      192.0.2.0/24
descr:      Example Company Inc - Web servers
origin:     AS64496
mnt-by:     MAINT-AS64496
changed:    [email protected] 20180711
source:     ALTDB

route6:     2001:DB8:0:1000::/48
descr:      Example Company Inc - Web servers
origin:     AS64496
mnt-by:     MAINT-AS64496
changed:    [email protected] 20180711
source:     ALTDB
route: 192.0.2.0/24 - Describe a specific IPv4 route being exported from your network over BGP.
Route objects don’t support ranges of prefix length, so if you use various levels of disaggregation in your network, you’ll need to create route objects for each length of prefix you expect to advertise.
route6: 2001:DB8:0:1000::/48 - The same thing goes for IPv6;
you need to define a route6 object for every prefix you expect to be advertising.
descr: Example Company Inc - Web servers - Give each prefix a human readable description.
One thing to remember is that this is all publicly viewable, so maybe consider exactly how much detail you’d like to include in your descriptions…
origin: AS64496 - This specifies which aut-num should be the origin of this prefix.
If you’re creating IRR objects to support originating the same prefix from multiple ASNs (i.e. for anycast) just appreciate that you’ll need to create a different route object with a different origin for each host network.
mnt-by: MAINT-AS64496 - Specify which mntners have permission to update or delete this object.
changed: [email protected] 20180711 - Record who last modified this object and when.
source: ALTDB - Specify which IRR database this object is being added to.
Step 5: Post Your Most General IRR Export Policy to PeeringDB
Since we now have the aut-num created with route/route6 objects for each of its prefixes, and optional as-set objects for the collection of your aut-num and your transit customers, you want to tell other networks which object to use for filtering.
We already specify this in the mp-export clause of the aut-num object, but some IRR tools will only look for your export policy from your PeeringDB profile.
If your first thought is that you don’t have a PeeringDB profile, you should probably correct that first. Being able to pull up a different network’s peering locations and peering policy all on one cross-referenced page is remarkable handy, so if you’d like other networks to ever peer with you, you should try and make it as easy as possible for them.
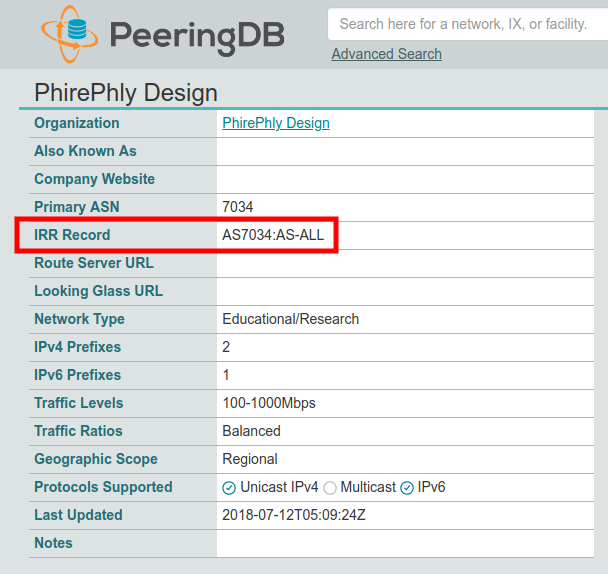
PeeringDB doesn’t support the fine-grain control that the aut-num object does with its ability to specify export policies per peer, but you should be able to select some aut-num or as-set object which would be the best default lacking a more specific policy described in your aut-num
While you’re logged into PeeringDB, you should also set your “IPv4 Prefixes” and “IPv6 Prefixes” fields. Many networks will pull those two numbers to set prefix limits on your peering sessions as well.
Step 6: Bask in the Glory and Check Your Work
That’s about it! At this point, your peers are able to query the IRR database network and can automatically generate prefix filters for your network based on what they find. The only work left for you as the network admin is to check your work and continue to keep your list of prefixes online up to date.
Your peers will presumably be running a scheduled job something like once per day to regenerate your peering list using a tool like bgpq3, so even once you add a new prefix you’re deploying, you may need to wait a day or two to see the prefix fully propagate through all your peering links as they update their filters. If a new prefix is particularly urgent, you may be able to contact your peer’s NOC and request they kick off a filter update for your link ahead of their standard schedule.
To check your work, there is the handy IRR Explorer tool.
This tool lets you search by your ASN and will show you what prefixes are seen coming from your network over BGP compared to what prefixes are documented in various IRR databases and flag any inconsistencies.
It is not unusual to find dangling IRR objects left over from the previous user of your ASN, or other networks who have just added your prefixes under their ASNs by accident.
Much of the information in IRR is incredibly out of date, and maintainers tend to not clean up objects unless asked to, so if you’d like, feel free to email the contact info listed in their mntner objects to ask they remove the IRR objects that shouldn’t be there.
Just to recap all of the objects we stepped through here in one place, at the minimum two emails were sent to [email protected];
one to create the mntner object, and a second with all the objects for the network itself once the mntner object was approved.
mntner:     MAINT-AS64496
descr:      Maintainer for Example Company Inc
admin-c:    JOESMITH-RIPE
tech-c:     JANEDOE-ARIN
upd-to:     [email protected]
mnt-nfy:    [email protected]
auth:       MAIL-FROM [email protected]
mnt-by:     MAINT-AS64496
changed:    [email protected] 20180711
source:     ALTDB
And after the approval, you can actually send all the following objects in one big email separated by blank lines:
aut-num:    AS64496
as-name:    EXAMPLECOMPANYINC
descr:      Example Company Inc
mp-export:  afi any.unicast to AS-ANY announce AS64496:AS-ALL
admin-c:    JOESMITH-RIPE
tech-c:     JANEDOE-ARIN
mnt-by:     MAINT-AS64496
changed:    [email protected] 20180711
source:     ALTDB

as-set:     AS64496:AS-ALL
descr:      A set covering AS64496 and their zero transit customers
members:    AS64496
mnt-by:     MAINT-AS64496
changed:    [email protected] 20180711
source:     ALTDB

route:      192.0.2.0/24
descr:      Example Company Inc - Web servers
origin:     AS64496
mnt-by:     MAINT-AS64496
changed:    [email protected] 20180711
source:     ALTDB

route6:     2001:DB8:0:1000::/48
descr:      Example Company Inc - Web servers
origin:     AS64496
mnt-by:     MAINT-AS64496
changed:    [email protected] 20180711
source:     ALTDB
The IRR server should respond to your submissions with a report of which objects were successfully authenticated and parsed and which ones weren’t, so look for that fairly rapidly after you submit your objects. Emails from the IRR databases will often end up in your spam folder, so make sure to check there as well.
Deleting RPSL Objects from IRR Databases
At some point in the future, you will realize that you no longer need a route/route6 object or as-set object as your network changes, so you will need the ability to delete the object from your IRR database.
To do this, you need to submit an exact copy of your current object in the database, with an extra delete: reason date line appended to it.
route:      192.0.2.0/24
descr:      Example Company Inc - Web servers
origin:     AS64496
mnt-by:     MAINT-AS64496
changed:    [email protected] 20180711
source:     ALTDB
delete:     [email protected] Finally migrating web servers to IPv6 only 20320312
If you have lost track of the original object locally and need to pull the object off the database to append the delete clause, you may need to add the -B flag to your whois query since some databases modify objects to remove things like email addresses normally. You can also download full dumps of the IRR database from their FTP servers if you find it easier to search for your current objects in a text file than to run whois queries to try and find your objects.
Useful RFCs and links for further reference:
- RFC2622 - “Routing Policy Specification Language (RPSL)”: Describes the basic RPSL object syntax
- RFC4012 - “Routing Policy Specification Language next generation (RPSLng)”: Describes useful additions to the RPSL language such as IPv6
route6objects - RFC2650 - “Using RPSL in Practice”: A tutorial on generating RPSL objects, much like this article
- RFC7682 - “Considerations for Internet Routing Registries (IRRs) and Routing Policy Configuration: Some of the problems and lessons learned about the IRR system
- ARIN’s IRR User Guide
- RIPE’s Docoumentation on using PGP to authenticate mntner objects: In case you’d like to use more robust authentication than that documented in this article
- IRR Explorer - A remarkably handy tool for generating a dashboard of your current IRR status compared to what’s seen on BGP coming from your network